Fixing publicly exposed WordPress files can mitigate vulnerabilities caused by misconfiguration of your WordPress website. Because leaving certain WordPress files exposed can result in bad actors gaining unauthorized access to your website, fixing access to such files is very important.
In this tutorial, you will learn how to make your WordPress websites more secure by improving the privacy of files and directories that you might have unintentionally left exposed.
Need for improving WordPress file privacy and security
While people need access to some files on your website to navigate and use it properly, there are some other files and directories, such as wp-config.php and wp-admin, which should be protected against public access.
Having access to these files and directories can provide visitors with unauthorized access to your website. Improved file privacy will limit the access of malicious actors to these files and safeguard your website.
For example, wp-config.php is an important WordPress file that contains sensitive information critical for your website. This includes the credentials required to access the database, which stores all the information related to your website. As such. it is important that wp-config.php isn’t exposed so that any sensitive information that it contains isn’t leaked.
Your users trust your website with their data. Therefore, you should try your best to protect any information they provide you from malicious actors. This is also important for complying with regulations such as GDPR and PCI-DSS, among others. Hardening the security and privacy around some of the publicly exposed WordPress files goes a long way in doing that.
Attack prevention
It is also important to protect wp-admin. Should someone gain access to the admin area, they might try to install backdoors to your WordPress website in a variety of places, such as themes, plugins, and the wp-includes directory for future access or other malicious motives.
Any exposed WordPress files might also be susceptible to a variety of attacks. SQL Injection and cross-site scripting (XSS for short) attacks are two common types of attacks. Weak privacy settings for important WordPress files can result in attackers injecting harmful code into your files and compromising data.
Another risk of publicly exposed files is that someone might be able to inject inappropriate content or ads inside your blog posts etc. Not only does this result in a bad user experience, but it also gives your brand a bad reputation.
As you can see, it is very important that you reduce the exposure of different files in your WordPress websites. Following the principle of least privilege, people should only be able to access what they need to accomplish their tasks.
Disable directory browsing
Different directories on a website generally have an index page. In the case of WordPress, it could either be index.html or index.php. This index page serves as the entry point into the directory.
For example, let’s say you have a directory called /products/ on your website. If you have an index.php file inside the directory, then someone visiting either https://your-website.com/products/ or https://your-website.com/products/index.php will be served the content from the index.php file. In other words, someone visiting either the directory or the index page gets served the index page if it is available.
If you don’t have an index file in a directory, someone who visits https://your-website.com/products/ will get a list of all the files and sub-directories in that directory.
When directory listing isn’t disabled, the ability of visitors to see the contents of a directory can become a security issue. Bad actors can exploit it to either gain access to your website or do other damage.
There are multiple ways in which you can disable directory browsing, including:
Using a .htaccess file
If you want to disable directory browsing for a particular directory, you can create a .htaccess file in the directory and add the following line to it.
Options -IndexesThis line will disable directory browsing for the directory where this file is located. You can add this line to the root of your WordPress installation to disable directory browsing site-wide.
Anyone who tries to visit a directory with no index file now will get a 403 Forbidden error instead of getting a list of files and sub-directories inside the directory.
Using the cPanel controls
If your WordPress hosting provider provides access to a hosting control panel such as cPanel, you can also disable directory browsing through its admin area.
Log into your cPanel account and scroll down until you see the Advanced section, which lists Indexes as one of its menu options, as shown below.
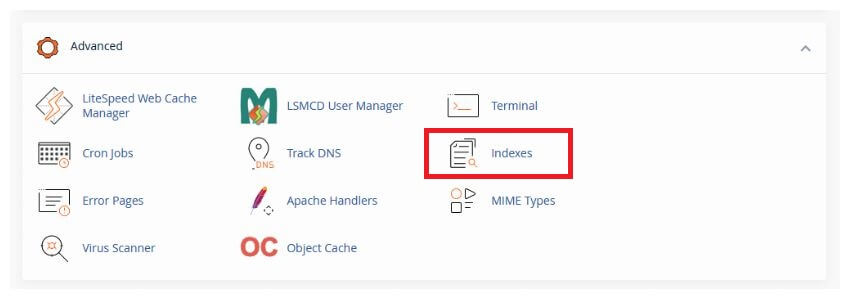
Click on Indexes, and it will show you a list of directories. You can click the Edit button beside each directory to specify the indexing settings for that directory. The four indexing options are:
- Inherit — This mode will tell the directory to use its parent directory’s setting
- No Indexing — This means that no files or sub-directories will appear on the front end if the index file is missing
- Show Filename Only — This means that users will see a simple list of files
- Show Filename and Description — This means that the users will see a list of files along with their size and type
You need to select the No Indexing option for the home directory. All other directories need the Inherit option enabled.
This will disable directory browsing for all the directories on your website.
Protect WordPress uploads directory
All the media files that you upload on your website go into the uploads folder present under wp-content in your WordPress installation. This directory plays an important role in storing and managing your media files.
If your website allows user-generated content to be uploaded to the server through the use of different forms or plugins, it will also be stored in the uploads directory. This makes it very important to properly secure the uploads directory.
Bad actors will usually try to upload malware on websites where user content or files can be uploaded. This makes it very important for you to sanitize and validate all uploaded files. You should also implement file type restrictions and set proper file permissions.
You should also have content moderation and usage restrictions in place if you decide to allow users to upload files. There should be clear guidelines on what type of files they can upload and what are the size limits.
Also, make sure that you have disabled PHP execution within the uploads directory. This is disabled by default. However, you should double-check that any server configuration settings or .htaccess rules aren’t allowing PHP execution within the directory.
You can also explicitly disable PHP execution by adding the following code to the .htaccess file within the wp-content/uploads directory.
<Files *.php>
deny from all
</Files>
Protect the wp-includes directory
The wp-includes directory contains all the WordPress core files required for your website’s proper functioning. The core files can be CSS files used for styling, JavaScript files and libraries used for frontend interactions, and PHP classes and functions that handle the backend or server side of your website.
Ensure that the files and directories have the right permissions
When you install WordPress, the permissions of all the files and directories inside wp-includes are automatically set to recommended values. However, you should regularly check if those values are still what they are supposed to be.
The directories should have permission 755, while the files are supposed to have permission 644. The 755 permission gives the owner full read, write, and execute access while everyone else has read and execute permissions. The 644 permission gives the owner read and write access while everyone else just has read access.
You might want to read our tutorial on configuring secure WordPress website and web server permissions to better understand what these different values mean.

You can see and update the existing permissions either by using the control panels like cPanel that most web hosts provide or through FTP applications such as FileZilla. Having proper permissions set up reduces the chances of someone executing malicious code.
Use .htaccess to limit access
The .htaccess file can prove very useful if you are planning to restrict user access to certain files and directories. WordPress.org officially recommends that you add the following snippet to your root .htaccess file to improve security.
# Block the include-only files.
<IfModule mod_rewrite.c>
RewriteEngine On
RewriteBase /
RewriteRule ^wp-admin/includes/ - [F,L]
RewriteRule !^wp-includes/ - [S=3]
RewriteRule ^wp-includes/[^/]+\.php$ - [F,L]
RewriteRule ^wp-includes/js/tinymce/langs/.+\.php - [F,L]
RewriteRule ^wp-includes/theme-compat/ - [F,L]
</IfModule>
Make sure that you put these rules outside of the # BEGIN WordPress and # END WordPress tags. Otherwise, there is a chance that WordPress might overwrite them in the future.
The primary purpose of these lines is to block access to files and folders within the wp-includes directory.
On the fifth line, we are preventing users from accessing files or directories within the wp-admin/includes/ path. The F flag indicates that the server should return a 403 Forbidden error message. The L flag indicates that no other rules should be processed.
The next rule allows all requests that don’t start with wp-includes to skip the next three rules and proceed without interruption. The next three rules determine how requests for PHP files within the wp-includes directory should be processed. These rules simply block access to different directories and files by returning a 403 Forbidden error message.
There are many other rules that you can add to your .htaccess file to improve WordPress security. We have discussed them in detail in our definitive guide to WordPress .htaccess file.
Fixing publicly exposed php.ini file
PHP installations usually have a php.ini file, also called the configuration file. It is read every time PHP starts up. The php.ini file is responsible for determining how the PHP engine will behave at runtime.
There are several factors that can result in a publicly exposed php.ini file such as a misconfigured server which causes the php.ini file to be placed in a publicly accessible directory. You might also have references to the php.ini file in your backups.
If the php.ini file is publicly exposed and is writable, it can pose serious threats as attackers will now be able to change the configuration of your PHP extensions or libraries, enable or disable PHP functions, change error reporting settings, change resource limits, etc.
Our tutorial on protecting the wp-config.php file discusses how you can restrict access to the wp-config.php file through a directive in the .htaccess file. You can use the same directive to protect the php.ini file by using the following code:
<Files php\.ini>
order allow,deny
deny from all
</Files>
You should also ensure you set up the proper permissions for the php.ini file to prevent unauthorized access. In most cases, you will want to set the file permissions to 600 so that only the owner of the file has read and write access to it.
As we mentioned earlier, the php.ini file can contain configuration options that enable or disable different functions and extensions. You should consider going through all the enabled extensions and see if you can disable some of them without affecting existing functionality.
Find and fix exposed backup and unreferenced files
There are two primary reasons why you might have backup files on your server.
File changes
The first one is that you might want to make changes to a file. However, it is always a good idea to have a backup of the original. So, you make a copy of the original. This way, you can update the original file and roll back any undesired changes in case they didn’t work as expected. This might be the case for files such as wp-config.php where you create a backup file and call it wp-config.php.bkp.
However, that backup file left in the folder (just in case, you know) can end up being the source of many aches and pains. Chances are pretty much anyone can download it and, with it, the entire configuration, in plain text, no less.

File backups
The second reason you might have backup files on the server is that you stored your whole backup there. Unfortunately, it’s not uncommon for WordPress website owners and administrators to configure cron jobs (scheduled tasks) to take database backups, only to store these backups on the same server.
While you most certainly should be backing up your website, take care that the backup files are not stored anywhere on the system you backed up. After all, backups are not worth much if you cannot use them to restore data.
Moreover, many WordPress administrators may not be aware that editing files in place using a file editor such as Vim may automatically create backup, recovery, and lock files. Vim creates these files to allow you to recover your work if Vim crashes or quits unexpectedly. While this is unquestionably a valuable feature to have, it also means that you may inadvertently end up with backup files you never intended to create sprinkled around your website, waiting for anyone to access.
Common examples of backup files include renamed old versions of modified configuration files, PHP files, or other source code, and automatic or manual backups in the form of compressed archives (such as .zip, .gz, or .tar.gz archives).
On the other hand, unreferenced files are misplaced files that, due to a configuration or design decision, end up somewhere where they do not belong.
Risks involved in keeping these files
Backup and unreferenced files accidentally left accessible may leak sensitive information. Depending on the file, sensitive data can include configuration parameters or source code that help malicious users better understand how your website works, thus making it easier to craft an attack against your website. In some cases, passwords that may give attackers control over the entire WordPress installation can also be leaked.
There are several ways someone can find leftover files on your web server. While some of the methods require some technical expertise, others are as simple as a Google search, which increases the risk of exposure. If you’re unsure whether you have leftover files on your server, continue reading to learn how you can search for them and find them before someone else does.
Finding backup files and unreferenced files
There are a few different methods someone can use to find backup and unreferenced files. As the server owner, you have the edge since you can go about it more directly. This section will explore these different tools, starting with the tools you can use to hunt and remove these files. We will then look at how a curious cat might go about finding backup and unreferenced files on your server.
When looking for backup files you may have left behind on your web server, you can take one (or more) of three approaches. The easiest way is to install a plugin that monitors files for changes.
File integrity monitoring plugin
A file integrity monitoring solution for WordPress can effortlessly help monitor file changes on your web server and alert you if it detects anything has been added, removed, or changed.
This can be achieved with the WordPress File Changes Monitor plugin. The plugin has a lot of features, and one of them is that it takes a hash of your directories and then compares it to subsequent fingerprints. In essence, it works on the same principles as a checksum, making it highly secure and reliable.
A file integrity monitor can be especially effective if you’re not privy to all of the directories used by WordPress. Another significant advantage of this plugin is that monitoring is automated, so you do not have to remember to check for files – the plugin does it automatically.
Use command line tools to find the files
Your cPanel account should give you access to a terminal that you can use to run some basic commands to find various files. Once you have logged into your cPanel account, look for a section titled Advanced, and you should see the option to open Terminal inside it. You can also accomplish this task with SSH using clients such as PuTTY.
Click on the terminal, and you will be asked if you want to proceed. Confirm that you would like to go ahead, and after a few moments, you will see the terminal.
We will use the find command to look for files with specific extensions such as .bak, .backup, or .zip, etc. We also look for files with prefixes such as bak- or old_, etc.
In this particular case, we are looking for files within the /var/www directory. You might need to provide a different directory, depending on your hosting setup.
Enter the following code into the terminal:
find /var/www -type f ( -name ‘*.bak’ -o -name ‘*.backup’ -o -name ‘*.bac’ -o -name ‘*.zip’ -o -name ‘*.tar’ -o -name ‘*.jar’ -o -name ‘*.log’ -o -name ‘*.swp’ -o -name ‘*~’ -o -name ‘*.old’ -o -name ‘*.~bk’ -o -name ‘*.orig’ -o -name ‘*.tmp’ -o -name ‘*.exe’ -o -name ‘*.0’ -o -name ‘*.1’ -o -name ‘*.2’ -o -name ‘*.3’ -o -name ‘*.gz’ -o -name ‘*.bz2’ -o -name ‘*.7z’ -o -name ‘*.s7z’ -o -name ‘*.lz’ -o -name ‘*.z’ -o -name ‘*.lzma’ -o -name ‘*.lzo’ -o -name ‘*.apk’ -o -name ‘*.cab’ -o -name ‘*.rar’ -o -name ‘*.war’ -o -name ‘*.ear’ -o -name ‘*.tar.gz’ -o -name ‘*.tgz’ -o -name ‘*.tar.z’ -o -name ‘*.tar.bz2’ -o -name ‘*.tbz2’ -o -name ‘*.tar.lzma’ -o -name ‘*.tlz’ -o -name ‘*.zipx’ -o -name ‘*.iso’ -o -name ‘*.src’ -o -name ‘*.dev’ -o -name ‘*.a’ -o -name ‘*.ar’ -o -name ‘*.cbz’ -o -name ‘*.cpio’ -o -name ‘*.shar’ -o -name ‘*.lbr’ -o -name ‘*.mar’ -o -name ‘*.f’ -o -name ‘*.rz’ -o -name ‘*.sfark’ -o -name ‘*.xz’ -o -name ‘*.ace’ -o -name ‘*.afa’ -o -name ‘*.alz’ -o -name ‘*.arc’ -o -name ‘*.arj’ -o -name ‘*.ba’ -o -name ‘*.bh’ -o -name ‘*.cfs’ -o -name ‘*.cpt’ -o -name ‘*.dar’ -o -name ‘*.dd’ -o -name ‘*.dgc’ -o -name ‘*.dmg’ -o -name ‘*.gca’ -o -name ‘*.ha’ -o -name ‘*.hki’ -o -name ‘*.ice’ -o -name ‘*.inc’ -o -name ‘*.j’ -o -name ‘*.kgb’ -o -name ‘*.lhz’ -o -name ‘*.lha’ -o -name ‘*.lzk’ -o -name ‘*.pak’ -o -name ‘*.partimg.’ -o -name ‘*.paq6’ -o -name ‘*.paq7’ -o -name ‘*.paq8’ -o -name ‘*.pea’ -o -name ‘*.pim’ -o -name ‘*.pit’ -o -name ‘*.qda’ -o -name ‘*.rk’ -o -name ‘*.sda’ -o -name ‘*.sea’ -o -name ‘*.sen’ -o -name ‘*.sfx’ -o -name ‘*.sit’ -o -name ‘*.sitx’ -o -name ‘*.sqx’ -o -name ‘*s.xz’ -o -name ‘*.tar.7z’ -o -name ‘*.tar.xz’ -o -name ‘*.uc’ -o -name ‘*.uc0’ -o -name ‘*.uc2’ -o -name ‘*.ucn’ -o -name ‘*.ur2’ -o -name ‘*.ue2’ -o -name ‘*.uca’ -o -name ‘*.uha’ -o -name ‘*.wim’ -o -name ‘*.xar’ -o -name ‘*.xp3’ -o -name ‘*.yz1’ -o -name ‘*.zoo’ -o -name ‘*.zpaq’ -o -name ‘*.zz’ -o -name ‘*.include’ -o -name ‘*_1’ -o -name ‘*_2’ -o -name ‘*_x’ -o -name ‘*bak’ -o -name ‘*_bak’ -o -name ‘*old’ -o -name ‘*_old’ -o -name ‘*_a’ -o -name ‘*_b’ -o -name ‘*_c’ -o -name ‘*_d’ -o -name ‘*_e’ -o -name ‘*_f’ -o -name ‘*inc’ -o -name ‘*_inc’ -o -name ‘*_backup’ -o -name ‘* – Copy’ -o -name ‘* – Copy (2)’ -o -name ‘* – Copy (3)’ -o -name ‘*backup’ -o -name ‘*-backup’ -o -name ‘*-bak’ -o -name ‘*-old’ -o -name ‘*-1’ -o -name ‘*-2’ -o -name ‘* – Copy – Copy’ -o -name ‘*(copy)’ -o -name ‘*(another copy)’ -o -name ‘*(second copy)’ -o -name ‘*(third copy)’ -o -name ‘*(fourth copy)’ -o -name ‘*(2nd copy)’ -o -name ‘*(3rd copy)’ -o -name ‘*(4th copy)’ -o -name ‘* (copy)’ -o -name ‘* (another copy)’ -o -name ‘* (second copy)’ -o -name ‘* (third copy)’ -o -name ‘* (fourth copy)’ -o -name ‘* (2nd copy)’ -o -name ‘* (3rd copy)’ -o -name ‘* (4th copy)’ -o -name ‘Copy of *’ -o -name ‘Copy (2) of *’ -o -name ‘Copy (3) of *’ -o -name ‘Copy of Copy of *’ -o -name ‘backup*’ -o -name ‘backup_*’ -o -name ‘backup-*’ -o -name ‘bak*’ -o -name ‘bak_*’ -o -name ‘bak-*’ -o -name ‘old*’ -o -name ‘old_*’ -o -name ‘old-*’ -o -name ‘1*’ -o -name ‘1_*’ -o -name ‘1-*’ -o -name ‘2*’ -o -name ‘2_*’ -o -name ‘2-*’ )Fuzzing
Fuzzing allows you to find security vulnerabilities in your website by helping you look for some rogue files with unexpected names. FFUF is a popular open-source project that lets you fuzz faster using the command line. You can read this excellent tutorial to get started with FFUF.
Basically, we will be making a bunch of requests to different files based on a list of words that have been put together by a variety of knowledgeable people. You can find the whole collection in the GitHub repository SecLists.
In this particular case, we want to focus on WordPress-related terminology. Therefore, we head over to Discovery/Web-Content/CMS/wordpress.fuzz.txt to get our word list. Our interest is in looking for backup files, so we execute the following command, which checks for the extensions .bak and .backup, which are common backup extensions. You will want to expand this list for a more exhaustive search.
ffuf -u http://example.com/FUZZ -w wordlist.txt -e ‘.bak,.backup’An alternative to backup file enumeration
Keeping backup files on your WordPress website can be pretty risky. As such, you should always use a test or staging environment to carry out your changes before pushing them to the live/production server. Most managed WordPress hosting accounts come with a staging environment right out of the box. You can also use software such as Flywheel Local, which lets you spin up WordPress instances on your PC.
Nevertheless, if you choose to keep backup files on your web server, ideally, keep them out of the directory you have configured your webserver to serve.
More tips to eliminate vulnerabilities
There are a few more general tips that you can follow to further improve the security of your site.
- Search engines rely on web scrapers or bots to scan your entire website for content. You can use a robots.txt file placed inside the root directory in order to guide them around and get better SEO results. For example, you can use this file to tell the bots which files to scrape or ignore. Unfortunately, the same file is also accessible to bad actors. Therefore, you should not place any sensitive information related to files on your website.
- It is also important that none of the web pages or the WordPress themes you are using on your website expose information such as the version of WordPress you are using. For example, WordPress installations by default, include information about the WordPress version in use inside the header. Similarly, the popular eCommerce plugin WooCommerce also adds its version information to the header. You should turn off the option to display this information through the WordPress admin area.
- Ensure that any of your installed WordPress plugins don’t display the information needed to publicly debug the website. Any debugging information should not be publicly visible in the production version of your web application.
Conclusion
In this tutorial, you learned how to harden the security of a WordPress website by restricting the access of users to different files and directories. Improving file privacy and protecting some of these files and directories from exposure prevents a lot of unfortunate situations, such as the injection of harmful code, leakage of sensitive data, and other security risks.
Once you’ve fixed publicly exposed files, it’s also important to start monitoring WordPress file changes. Doing so helps you stay on top of any changes. You can then take immediate action and avoid unnecessary security risks.